OK so we all know how to make an espresso in an espresso machine, or make coffee in a french press. But do you ever wonder what the right amount of coffee to use is? Or what you can do to make a perfect coffee?
Ever heard of a "pour-over coffee" or a "siphon"?
I found this site and followed the instructions. Worked out pretty well for me.
Monday, March 15, 2010

Setting up a Time Machine server on Ubuntu 9.10 or 10.04
After looking at several websites, most notably kremalicious, bob's notepad, I finally figured out the easiest way to set up my Ubuntu 9.10 server as a time machine server today. The older methods no longer apply when using netatalk 2.0.5.
This new easy way uses the latest netatalk 2.0.5 which has a new option called the "timemachine" option (options:tm). Unlike previous versions, this version does not need to be recompiled with "ssl" support because it is using a new library (uams_dhx2). This library allows me to login from both my Mac computers running 10.5.8 and 10.6.2.
Install and Configure Netatalk
If you are using Ubuntu 9.10, like I am, then you need to get and install the following 3 packages from packages.debian.org, in this order. Ignore the message from the package installer that tells you there is an older version in the repository that is recommended.
libdb4.8
libgcrypt11
netatalk2.0.5
If you are using Ubuntu 10.04, just open up synaptic package manager, and download/install the netatalk package. Its that simple.
That's basically it. Keep the files /etc/default/netatalk, /etc/netatalk/afpd.conf, as the defaults. The only file that has to be changed is /etc/netatalk/AppleVolumes.default. My files look like this. (important bits shown):
/etc/default/netatalk:
Notice that #AFPD_UAMLIST is commented out (default)
Notice that AFPD_RUN=yes
Leave the last line commented out (which is how it is if you didn't touch anything).
Basically everything in this file is commented out
In my case, I created a brand new partition called /TimeMachine on my Ubuntu linux server. You can specify any directory on your linux box as long as everyone has read/write permissions on it.
Also make sure everyone has read/write permissions to the directory you are sharing:
After modifying this file (AppleVolumes.default), just restart netatalk:
Do this by opening a finder window and selecting "Go, Connect to Server...". Under "Server Address" you should put in the IP of your linux server:
In my case:
Server Address: afp://192.168.2.11
Finder should ask you to login. Use any login name for a valid user on your linux box. This is the username/password you use to log into your ubuntu session.
If everything worked out well, you should be seeing the contents of your empty TimeMachine directory on your mac. Check to see you can create a file in this directory (to make sure you have read/write permissions).
If you were not able to log in, (your Mac told you your username/password were wrong, or something else happened) look in /var/log/daemon.log on your linux server. There are often very useful debug messages at the bottom of this file.
Configure Avahi
The next step is to make the share just show up on the side of your MAC finder windows under "SHARED", so that you don't have to go and select "Go, Connect to Server..." as we did above.
If all your packages are up to date on Ubuntu 9.10, avahi is already installed. All you have to do is create a file called /etc/avahi/services/afpd.service with the contents.
(taken straight out of this article)
This new easy way uses the latest netatalk 2.0.5 which has a new option called the "timemachine" option (options:tm). Unlike previous versions, this version does not need to be recompiled with "ssl" support because it is using a new library (uams_dhx2). This library allows me to login from both my Mac computers running 10.5.8 and 10.6.2.
aleem@sidi-desktop:~$ ps -ef | grep afpdHere is how to do it.
root 25883 1 0 01:38 ? 00:00:00 /usr/sbin/afpd -U uams_dhx2.so,uams_clrtxt.so -g nobody -c 50 -n sidi-desktop
Install and Configure Netatalk
If you are using Ubuntu 9.10, like I am, then you need to get and install the following 3 packages from packages.debian.org, in this order. Ignore the message from the package installer that tells you there is an older version in the repository that is recommended.
libdb4.8
libgcrypt11
netatalk2.0.5
If you are using Ubuntu 10.04, just open up synaptic package manager, and download/install the netatalk package. Its that simple.
That's basically it. Keep the files /etc/default/netatalk, /etc/netatalk/afpd.conf, as the defaults. The only file that has to be changed is /etc/netatalk/AppleVolumes.default. My files look like this. (important bits shown):
/etc/default/netatalk:
Notice that #AFPD_UAMLIST is commented out (default)
Notice that AFPD_RUN=yes
# specify this if you don't want dhx and dhx2/etc/netatalk/afpd.conf:
# available options: uams_guest.so, uams_clrtxt.so,
# uams_dhx.so, uams_dhx2.so,
# uams_randnum.so
#AFPD_UAMLIST="-U uams_dhx2.so,uams_clrtxt.so"
# Change this to set the id of the guest user
AFPD_GUEST=nobody
# Set which daemons to run (papd is dependent upon atalkd):
ATALKD_RUN=no
PAPD_RUN=no
CNID_METAD_RUN=no
AFPD_RUN=yes
TIMELORD_RUN=no
A2BOOT_RUN=no
Leave the last line commented out (which is how it is if you didn't touch anything).
Basically everything in this file is commented out
# - -transall -uamlist uams_dhx.so,uams_dhx2.so -nosavepassword/etc/netatak/AppleVolumes.default:
In my case, I created a brand new partition called /TimeMachine on my Ubuntu linux server. You can specify any directory on your linux box as long as everyone has read/write permissions on it.
# By default all users have access to their home directories.You can replace /TimeMachine with a directory in your home drive, example :
#~/ "Home Directory"
/TimeMachine "TimeMachine" options:tm
/home/aleem/TimeMachine "TimeMachine" options:tmThe important bit here is the "options:tm" part. Other than that, nothing else needs to be speicified.
Also make sure everyone has read/write permissions to the directory you are sharing:
aleem@sidi-desktop:/$ ls -la | grep TimeMIn order to have read/write permissions to the directory you need to do:
drwxrwxrwx 10 root root 4096 2010-03-15 13:43 TimeMachine
aleem@sidi-dekstop:/$ sudo chmod a+rw /TimeMachineIn case you're interested, the filesystem on which my TimeMachine directory lies is formatted ext3.
(or /home/aleem/TimeMachine, whatever you decided was your directory)
After modifying this file (AppleVolumes.default), just restart netatalk:
aleem@sidi-dekstop:/$ sudo /etc/init.d/netatalk restartYou should see the apfd daemon running at this point:
aleem@sidi-desktop:/$ ps -ef | grep afpdIf all is good at this point, you should be able to go on any mac on your network and connect to the directory that you shared.
root 25883 1 0 01:38 ? 00:00:00 /usr/sbin/afpd -U uams_dhx2.so,uams_clrtxt.so -g nobody -c 50 -n sidi-desktop
Do this by opening a finder window and selecting "Go, Connect to Server...". Under "Server Address" you should put in the IP of your linux server:
In my case:
Server Address: afp://192.168.2.11
Finder should ask you to login. Use any login name for a valid user on your linux box. This is the username/password you use to log into your ubuntu session.
If everything worked out well, you should be seeing the contents of your empty TimeMachine directory on your mac. Check to see you can create a file in this directory (to make sure you have read/write permissions).
If you were not able to log in, (your Mac told you your username/password were wrong, or something else happened) look in /var/log/daemon.log on your linux server. There are often very useful debug messages at the bottom of this file.
Configure Avahi
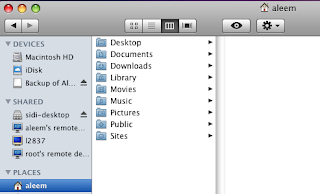
The next step is to make the share just show up on the side of your MAC finder windows under "SHARED", so that you don't have to go and select "Go, Connect to Server..." as we did above.
If all your packages are up to date on Ubuntu 9.10, avahi is already installed. All you have to do is create a file called /etc/avahi/services/afpd.service with the contents.
(taken straight out of this article)
aleem@sidi-desktop:/etc/avahi/services$ sudo gedit afpd.service<service-group><name replace-wildcards="yes">%h</name><service><type>_afpovertcp._tcp</type><port>548</port></service><service><type>_device-info._tcp</type><port>0</port><txt-record>model=Xserve</txt-record></service></service-group>
At this point, no need to restart avahi, your server should automatically pop up on the left hand side of your Mac Finder window. In my case it's called "sidi-desktop".
Make your Mac Use Network Volumes for Time Machine Backups
At some point it was important to run this command on your Mac using Terminal (Applications, Utilities, Terminal). However with the "options:tm" specified above, this is no longer necessary.
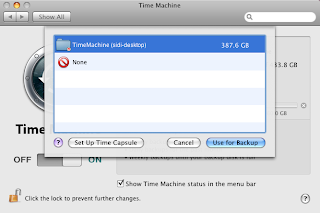
So that's it! Nothing more. Now you can go to your Time Machine settings on the Mac, and your TimeMachine share should show up. If it doesn't make sure it is mounted in finder (i.e. it appears with an eject symbol next to it on the left side of the finder window under SHARED)
Have fun backing things up.

Make your Mac Use Network Volumes for Time Machine Backups
At some point it was important to run this command on your Mac using Terminal (Applications, Utilities, Terminal). However with the "options:tm" specified above, this is no longer necessary.
[aleems-mac-mini: ~] aleem% defaults write com.apple.systempreferences TMShowUnsupportedNetworkVolumes 1
(no longer need to type this in Terminal)
Open up Time Machine Preferences on your Mac and Select your TimeMachine volume to back up

Have fun backing things up.
Subscribe to:
Posts (Atom)